Hey everyone, so I have switched over to Wordpress. I won't delete this blog as it has all of my previous posts and links from Pinterest, but all of my new posts will be over on the new site.
Check it out here: http://masonjarsandlemonbars.wordpress.com/ . Can't wait to see you there!

Sunday, August 24, 2014
Saturday, August 23, 2014
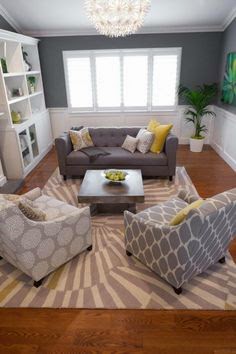
Living Room Redo: Before & Inspiration
Laren and I bought our house the end of May and started redoing it the beginning of June. Let me start off by saying that we were totally okay with fixer uppers for a few reasons: they were a lot cheaper, we weren't afraid of getting our hands dirty, and we could create a look that was ours from the very get go. That being said this was probably the only house we walked into that we absolutely loved and that required the least amount of repairs compared to the others others we looked at and we still changed almost everything in it! Also, we didn't have a lot of time so we jumped right into our renovations which meant we also forgot to take good pictures of the before. Below is the only picture I could find, but it gives you the basic idea.
Before
The popcorn ceilings were cream with some gold glitter and I felt they just looked dirty. The crown molding and base trim were also a cream to go with the walls that were somewhere between a gold and mustard yellow. It wasn't terrible, just not our style. The wood floors also weren't bad, but I wanted something a little bit darker. All in all, I wanted something a fresh new look that fit our style better.

Inspiration / Vision
Overall I wanted a space that was very classy yet functional. I love farm vintage, but I also love clean lines so I wanted a space that combined those two worlds. We don't have an open concept floor plan, so this is really the only room that people see when they first walk into our house. I wanted it to be more formal, but still a place where we could spend time as a family upstairs. There were a few things I felt were absolute had to have for this space: gray walls, built in bookcases, a mixture of modern and vintage furniture pieces. Below are some of photos I used an inspiration for this space (courtesy of Pinterest).


Process:
Here are photos of the bare bones process (e.i paint, floor, molding).


After
Redoing this space took a lot of work and sometimes a lot of money, but I am so happy with how it turned out. Here is a list of what we did: took down popcorn ceilings, painted walls gray, painted molding and trim white ( including window frame), put in new wood floors. Here is a preview of the finished product, check back tomorrow for the full reveal!


Monday, May 5, 2014
Little Boy Birthday Decorations
My son turned one in March and we had some family and close friends over for a little party. I wanted to have a theme, but seeing as he was turning one I didn't want to go too overboard. He loves animals so I picked a farm animal theme. I got on my best friend Pinterest to search for ideas and was a little overwhelmed at all of the different ideas. I didn't have enough time to buy a party kit on Etsy and I really didn't want to spend a lot of money. I found a cute animal banner and decided it would be the perfect decoration. I downloaded the digital file from the Silhouette store, I have a gift card, but it was only 50 cents. My husband and father-in-law spent about an hour putting the banner together. I created a "Happy Birthday" banner in Photoshop and had it printed at Walmart. We hole punched each corner and strung it with hemp rope. I also used his birthday stats board as a decoration on our table. I had a hard time deciding on the cake, but ended up going with a cow cake. I used cream cheese buttercream frosting and black sugar sheet. FYI sugar sheets are disgusting and the colors run, it worked out because cows are usually a creamish color, but if you have the time fondant would be a much better option. I used bananas dipped in chocolate for the horns and blue M&M's for the eyes. I found animals in word and created toppers for the cupcakes. We used his ONE from his birthday photo shoot to finish off the dessert table. It was simple and clean and perfect for a little boy who won't remember it.


Friday, March 28, 2014
Little Boy Busy Board
I saw a busy board probably about six months ago on Pinterest and thought it would be such a fun idea to make for my sons first birthday. Life is busy and I would look at it occasionally, but I never got around to making it. His birthday was coming up and I decided I was really going to do it, so the Saturday before his birthday (his birthday was on a Tuesday) I dragged Laren over to the Habitat for Humanity Restore in Spanish Fork to see if we could pick up the different objects I wanted. To my surprise I was able to find everything and a few other items I liked! We bought all of our items at the Restore, including the boards, and paid less than $50. It would have cost me almost $80 to get them all on Amazon or at Home Depot.

We used chipboard for the main board and then Laren screwed in three thicker boards into the back so that not all of the screws would stick out. After Laren got the back boards screwed on I painted the board. I used a golden yellow paint from Home Depot, I just bought a sample size can, and then a regular black, also sample size. I painted the entire board yellow, it probably took two or three coats and then I used painters tape to measure out my diagonal lines. I painted every other line black and once they were all dry I pulled off the tape.
I used my Silhouette to cut the phrase at the top out of black vinyl. You could paint it or use a Sharpie. I am not good with free hand so it is easier for me to use the Silhouette. I spray painted the door knobs a brushed bronze, they were originally gold. I also spray painted the light switch panels white. The doors were wood rectangles I picked up in the craft section at Walmart and I painted them the same color as the board. I also painted the knobs and screwed them into the doors.
 Once the board was painted, I laid all of the different objects out on the board to see where I wanted them. Once I had it all figured out, Laren was kind enough to screw or glue everything in/on for me! We screwed everything in except for the thermostat, the key, and the wheels. For the wheels Laren drilled a hold and then filled it with glue and stuck the screw of the wheel in. The boards for the mini doors are not very thick, so we couldn't screw the screws in all the way. To fix that we filled in the gap with glue so it didn't wiggle. We did have to cut holes in the board to put the light switches in and both of the door knobs. It probably took Laren a total of 2 hours to get it all finished. The chipboard was somewhat hard to screw into, so it wasn't a very fast process.


Counting money and time, it wasn't the fastest or cheapest gift I could have made/bought for my one year old, but I am so glad we did it! He absolutely loves it. He is really curious and I love that he has a place to be curious instead of sticking his fingers in my outlets! One of the best things about this gift is that it is awesome for any child, boy or girl. Another great thing is that all of my other future children can use it and will hopefully love it too.
We used chipboard for the main board and then Laren screwed in three thicker boards into the back so that not all of the screws would stick out. After Laren got the back boards screwed on I painted the board. I used a golden yellow paint from Home Depot, I just bought a sample size can, and then a regular black, also sample size. I painted the entire board yellow, it probably took two or three coats and then I used painters tape to measure out my diagonal lines. I painted every other line black and once they were all dry I pulled off the tape.
I used my Silhouette to cut the phrase at the top out of black vinyl. You could paint it or use a Sharpie. I am not good with free hand so it is easier for me to use the Silhouette. I spray painted the door knobs a brushed bronze, they were originally gold. I also spray painted the light switch panels white. The doors were wood rectangles I picked up in the craft section at Walmart and I painted them the same color as the board. I also painted the knobs and screwed them into the doors.
Counting money and time, it wasn't the fastest or cheapest gift I could have made/bought for my one year old, but I am so glad we did it! He absolutely loves it. He is really curious and I love that he has a place to be curious instead of sticking his fingers in my outlets! One of the best things about this gift is that it is awesome for any child, boy or girl. Another great thing is that all of my other future children can use it and will hopefully love it too.
Friday, March 14, 2014
St. Patrick's Day Banner
I'm a little late getting all of my St. Patrick's Day decorations up, but better late than never right? To be honest St. Patrick's Day has never been one of my favorite holidays, so I've kind of stayed away from it. However, I saw this cute banner on Pinterest and decided I would give St. Patrick's Day a try this year. I pulled out my Silhouette Cameo for the first time ( that should give you an idea of how crazy things are around here!) and was able to do the banner in about an hour. It was so quick and turned out so cute. I cute both the banner flags and the shamrocks with my Silhouette. I used plain white buttons and craft paper from JoAnns to do this project. To glue everything together I used fabric glue.


Finished Shamrock
I wanted newspaper looking paper, but I loved this when I saw it. It has quotes about life from famous people.
I love how clean this banner looks
Thanks to my Silhouette, I whipped this up during naptime and love how it turned out. It is a cute and simple banner that adds a fun St. Patty's spirit to your home.
Sunday, February 16, 2014
DIY Tulle Skirt
Tulle skirts seem to be all the rage lately. I loved the idea, but definitely did not want to fork out an unreasonable amount of money on one. I loved Cotton and Curls tutorial and went out and bought all of the fabric to make it. The holidays came and around and I never got around to doing it. A few weeks ago I saw this fabulous tulle skirt and I knew I wanted to do something more like it. Valentine's day was coming up and I thought it would be the perfect opportunity to whip up a new skirt.
Materials:
Lining material - I used a pink calico fabric from JoAnns.
Waistband - You can do an elastic waistband, but I wanted more of a finished look so I used satin blanket binding in white.
Invisible zipper - If you are doing a ribbon or fabric waistband.
Tulle - I used 13 yards of white tulle, but I am loving the idea of a dark tan tulle skirt !

As far as cutting out your material to get the perfect circle I am going to send you back over to Cotton and Curls tutorial (See link above) because I am not so great at explaining it. I only used two layers so the lining material would still be pretty noticable. One would have worked, but I like the layers so I stuck with two.

In my opinon having this colored lining is what makes the skirt.


One of the things I like about using blanket binding for a waistband is that it is folded over and give you added thickness. I pinned the lining and the tulle together face up and then layed the waistband upside down and pinned it to the tulle/lining and then sewed them together. If you want to be really thorough I would serge or zig zag stich the edges.

I inserted the invisible zipper and then cut down my tulle the length of the zipper, probably a little bit shorter. Tulle is such a forgiving material that you can tuck the pieces into each other and no one will notice the cut. If you don't cut it you will have a hard time getting your skirt on.
If you want to use an elastic waistband cut your elastic the length of your waist, not stretched out. You can stretch if you want, but I wouldn't stretch it too much. Attach it the same way as your would the ribbon waistband and then you are done!

See you can't even tell the tulle is cut!


Reasons why I would make a terrible fashion blogger
Reason 1: Apparently I don't do a good job of looking at the camera. oops!
Reason 2: I get totally embarassed that people will walk by my husband taking photos of me and think I'm some weirdo.
In all seriousness I am not a fashion blogger, but I wanted to give you an idea of how you could wear a tulle skirt and just how cute it can look!


Shoutout to my wonderful husband who is also a wonderful photographer! You can check out his blog Pushinpin Pictures here.


This was my Valentine dinner outfit and it was so much fun! I love how you can pair so many different tops with this skirt and still have it look cute. This denim polka dot is one of my favorite shirts and I felt like it was the perfect combo with the pink and white! For a more casual look you could adds flat or even a cute pair of tennies or a plain t-shirt. This skirt is the perfect pick me up during those dreary winter months and a fun addition to any closet. It was also pretty cheap and easy to make!


Reason 3: I am a terrible twirler!
Saturday, February 15, 2014
Making our House a Home: Love Month
Yesterday may have been Valentine's Day, but we celebrate love all month long, so these are now my love month decorations. I love Valentine's Day, there are always so many fun decorations and cute ideas floating around the internet. Some of mine are new and some of old favorites. I hope you enjoy them as much as do ! P.S. if you have been following me on Instagram you have seen all these either in part or completely.


I made this wreath the first year we were married and it is still a favorite of mine! Check out the tutorial here.

My printable may not be Valentine specific, but I love it so much I decided to keep it up anyway.

These hearts are new this year and I love them! They were super easy and fun to make.


Finished shelf

I made this fun heart garland using wooden hearts and scrapbook paper from the wood connection. I traced the hearts onto the paper, cut them out and then use spray adhesive to stick the paper on. I used paperclips to attach the hearts to the string.


I made these jars last year and I love them! I love what a cute vinyl saying can do to an ordinary mason jar


This heart banner is from last year also. The tutorial hasn't made it's way to this blog yet, but it should be up soon!
Subscribe to:
Posts (Atom)