Sunday, February 16, 2014

DIY Tulle Skirt

Tulle skirts seem to be all the rage lately. I loved the idea, but definitely did not want to fork out an unreasonable amount of money on one. I loved Cotton and Curls tutorial and went out and bought all of the fabric to make it. The holidays came and around and I never got around to doing it. A few weeks ago I saw this fabulous tulle skirt and I knew I wanted to do something more like it. Valentine's day was coming up and I thought it would be the perfect opportunity to whip up a new skirt. 

Materials: 
Lining material - I used a pink calico fabric from JoAnns. 
Waistband -  You can do an elastic waistband, but I wanted more of a finished look so I used satin blanket binding in white. 
Invisible zipper - If you are doing a ribbon or fabric waistband. 
Tulle - I used 13 yards of white tulle, but I am loving the idea of a dark tan tulle skirt !


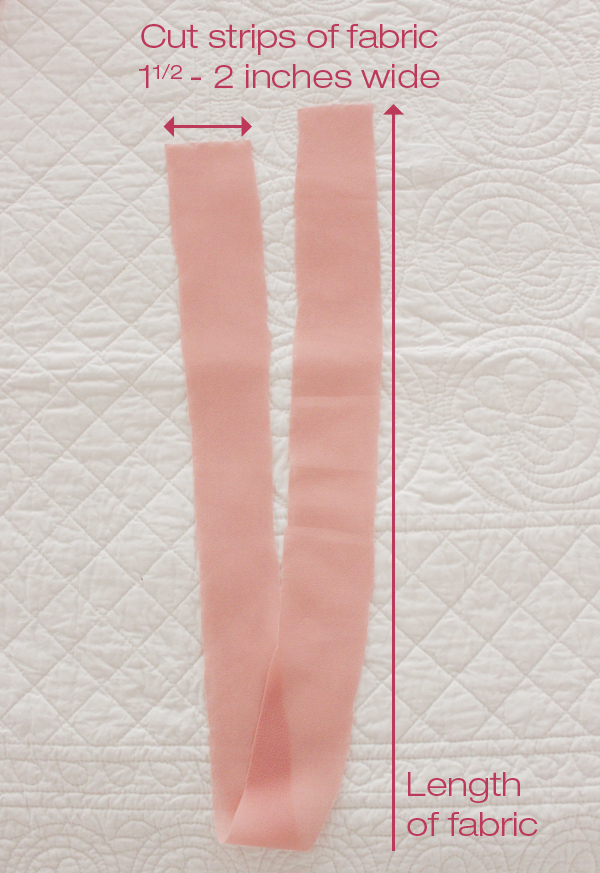
As far as cutting out your material to get the perfect circle I am going to send you back over to Cotton and Curls tutorial (See link above) because I am not so great at explaining it. I only used two layers so the lining material would still be pretty noticable. One would have worked, but I like the layers so I stuck with two.


In my opinon having this colored lining is what makes the skirt. 


One of the things I like about using blanket binding for a waistband is that it is folded over and give you added thickness. I pinned the lining and the tulle together face up and then layed the waistband upside down and pinned it to the tulle/lining and then sewed them together. If you want to be really thorough I would serge or zig zag stich the edges. 

I inserted the invisible zipper and then cut down my tulle the length of the zipper, probably a little bit shorter. Tulle is such a forgiving material that you can tuck the pieces into each other and no one will notice the cut. If you don't cut it you will have a hard time getting your skirt on. 

If you want to use an elastic waistband cut your elastic the length of your waist, not stretched out. You can stretch if you want, but I wouldn't stretch it too much. Attach it the same way as your would the ribbon waistband and then you are done!


See you can't even tell the tulle is cut!


Reasons why I would make a terrible fashion blogger
Reason 1: Apparently I don't do a good job of looking at the camera. oops! 
Reason 2: I get totally embarassed that people will walk by my husband taking photos of me and think I'm some weirdo. 
In all seriousness I am not a fashion blogger, but I wanted to give you an idea of how you could wear a tulle skirt and just how cute it can look!


Shoutout to my wonderful husband who is also a wonderful photographer! You can check out his blog Pushinpin Pictures here.


This was my Valentine dinner outfit and it was so much fun! I love how you can pair so many different tops with this skirt and still have it look cute. This denim polka dot is one of my favorite shirts and I felt like it was the perfect combo with the pink and white! For a more casual look you could adds flat or even a cute pair of tennies or a plain t-shirt. This skirt is the perfect pick me up during those dreary winter months and a fun addition to any closet. It was also pretty cheap and easy to make!


 Reason 3: I am a terrible twirler! 


Saturday, February 15, 2014

Making our House a Home: Love Month

Yesterday may have been Valentine's Day, but we celebrate love all month long, so these are now my love month decorations. I love Valentine's Day, there are always so many fun decorations and cute ideas floating around the internet. Some of mine are new and some of old favorites. I hope you enjoy them as much as do ! P.S. if you have been following me on Instagram you have seen all these either in part or completely.


I made this wreath the first year we were married and it is still a favorite of mine! Check out the tutorial here

My printable may not be Valentine specific, but I love it so much I decided to keep it up anyway. 


These hearts are new this year and I love them! They were super easy and fun to make.


Finished shelf

I made this fun heart garland using wooden hearts and scrapbook paper from the wood connection. I traced the hearts onto the paper, cut them out and then use spray adhesive to stick the paper on. I used paperclips to attach the hearts to the string. 


I made these jars last year and I love them! I love what a cute vinyl saying can do to an ordinary mason jar


This heart banner is from last year also. The tutorial hasn't made it's way to this blog yet, but it should be up soon!

Sunday, February 9, 2014

Valentine Catch Up

I promised a craft a day and while I have mostly stuck to it on Instagram, life this week was a little crazy. I missed a couple days, but here are days 5,6,8 and 9.

I picked this fantastic rustic heart up at World Market while I was home for Christmas. You can't really tell in the photo, but it is lightly dusted with glitter, which I think just adds that special something to this fun piece.


I originally got this idea from Brooke over at Silver Lining . I thought it was so cute I had to recreate it. 

This cute XOXO set is another Wood Connection craft. I decided to change mine up a bit, their display was mainly pink and grey, but I wanted mine to focus more on red. 


Also another Wood Connection craft. I love the book "I Love You This Much" and could not resist picking up this vinyl sign last time I was at the Wood Connection store. I used red and cream paint to get the antiqued look. The jar is from JoAnns and I added the chalkboard label to it. 

Monday, February 3, 2014

Mini Cake Stand

How cute is this cake stand?! Hurry on over to Jo Ann Fabrics and pick yourself up one or two or three. I have this cute pink one and a red one to go a long with it!


Sunday, February 2, 2014

DIY Heart Wreath

I made this wreath the first year I was married and it is still one of my favorite crafts! It is a little time consuming, but makes a great Sunday afternoon or evening craft!


I originally shared this tutorial over at The Pingrees but, I love it so much I wanted to share it with all of you here!

Growing up my mom always went all out for every holiday when it came to decorations. One of my favorite things when I was younger was helping her decorate. Let's be honest, I still love helping her decorate when I am at home! Thanks to my mom I am always looking for fun holiday decorations and since I am a poor married student I love holiday DIY crafts! While on Pinterest, I came across the best wreath idea and decided to try it out for Valentine's Day.

What you'll need:
1 1/2 yard of fabric
Scissors
A hot glue gun
Foam heart wreath 
Long pins - I would suggest getting them in the color of your fabric

Now that you have all of your materials you are ready to go!
I didn't take pictures of the first couple steps when I made mine, so we are going to use some from my inspiration at kellyhicksdesign.com 

1. Cut a strip of fabric 1 1/2 -2 inches wide the length of the fabric or whichever side is the longest. 

Take one end of the fabric and hot glue it to your wreath. 

Then wrap it all the way around your wreath.

Now that your wreath is covered let's move on to the ruffles. 
To make your ruffles cut your fabric the short way in strips of 1 1/2 - 2 in wide. You can experiment with the length of your strips, but I tried to keep mine a medium length for maximum fluff. 
The width of your fabric is totally up to you. The skinnier your strip, the smaller your ruffles, the wider your strip the bigger your ruffle. 

To make your ruffle take the strip at one end and fold it over and layer it. 


Continue folding it over until you get a half circle. Then take your pin and stick it in the middle.


Just one more picture from Kelly Hicks
Pin your ruffle onto your wreath.

Continue pinning your ruffles overlaying them as you go until your wreath looks like this


Then find the perfect spot in your home to hang it!


What is one of your favorite Valentine's decorations? 


Saturday, February 1, 2014

February

Can you believe it is February already? February is one of my favorite months so I have decided to post a DIY Valentine's decoration each day leading up to Valentine's Day. I have been neglecting this blog lately and I thought this would be the perfect way to get back into things and find a rythym. After Valentine's I am going to go through my Pinterest and pick some of my top crafts and do tutorials on them, but I will talk more about that later!

My first DIY craft comes from the Wood Connection, which is my favorite wood craft store! You can find the store display here. I immediately fell in love with it when I saw it. When I went to get my papers I found another paper that I love even more (the bicycle hearts) and decided to change mine up a bit. I painted all of my hearts and then attached the paper using modge podge. To finish them off I sanded the egdes and added the notes using bakers twine.


Be sure and check out my pinterest Jessica Helms and my Instagram @masonjarsandlemonbars for more!!